(Adding note about placeholders for unsafe webpage elements.) |
m (1 révision importée) |
||
| Ligne 1 : | Ligne 1 : | ||
| − | = | + | =Co-browse sessions= |
| − | |||
| − | + | A Genesys Co-browse session lets you and a customer navigate the same web page at the same time. Unlike conventional screen-sharing applications where one party sees an image of the other party's browser, in a Genesys Co-browse session both you and the customer share the same instance of the web page. | |
__TOC__ | __TOC__ | ||
{{CloudStep_Stack | {{CloudStep_Stack | ||
| − | |title= | + | |title=Start a Co-browse session |
| − | |text= | + | |text=The customer ''must'' initiate a Co-browsing session. You cannot start a Co-browse session. Websites set up for Genesys Co-browse include a Co-browsing button that the customer must click to start a Co-browsing session. |
| − | + | Clicking the Co-browsing button will present the customer with a session ID. If you are engaged in chat with the customer, the Co-browse session will automatically start in your workspace. Once the Co-browsing session starts, you see a special message in chat—''{start:123123123}'' for example, where <i>123123123</i> is the session ID. | |
| − | ''' | + | '''Note:''' For security considerations, you will only see a placeholder of certain website elements. |
|media1=WWE_GCB_Participating_in_a_session_1.png | |media1=WWE_GCB_Participating_in_a_session_1.png | ||
| Ligne 17 : | Ligne 16 : | ||
{{CloudStep_Stack | {{CloudStep_Stack | ||
| − | |title= | + | |title=Start a Co-browse session using a session ID |
| − | |text= | + | |text=If you are on a call or a chat and your Co-browse session does not automatically start, you can use a session ID to start a Co-browsing session. |
| − | + | Get the session ID from the customer and enter it in the '''Session ID''' field, then click the globe icon. | |
| − | + | You should now see the customer's browser. You do not need to navigate to the same page as the customer. Co-browse uses the session ID to make sure that you and the customer are viewing the same page. As soon as the session starts, the customer receives a notification on their screen that they have started a Co-browsing session. | |
| − | ''' | + | '''Note:''' Genesys Co-browse does not support conference or transfer for [[Chat|chat]] and [[Voice|voice]]. |
|media1=WWE_GCB_Starting_a_session.png | |media1=WWE_GCB_Starting_a_session.png | ||
| Ligne 30 : | Ligne 29 : | ||
{{CloudStep_Stack | {{CloudStep_Stack | ||
| − | |title= | + | |title=Use Pointer Mode |
|text= | |text= | ||
| − | + | When you first join a Co-browse session, you are in ''Pointer Mode''. You can see what the customer sees but you cannot perform any actions in their browser. You cannot navigate, input information, or submit forms. | |
| − | + | You and the customer can see each other's mouse movements at all times and your mouse clicks create a red circle effect around your mouse pointer. Use the red circle effect to direct the customer to specific sections on the web page. | |
| − | + | At any time, you can send a request to the customer to enable ''Write Mode''. | |
|media1=WWE_GCB_Current_mode.png | |media1=WWE_GCB_Current_mode.png | ||
}} | }} | ||
{{CloudStep_Stack | {{CloudStep_Stack | ||
| − | |title= | + | |title=Switch to Write Mode |
| − | |text= | + | |text=In Write Mode, both you and the customer can perform conventional user actions. Both of you can enter text and click buttons. |
| − | + | To switch to Write Mode, click the pencil icon at the top right corner of the Co-browse area. The customer is asked to approve the switch to Write Mode. Write Mode is enabled only if the customer approves. You receive a notification about the customer's response. | |
| − | + | If the customer approves the switch to Write Mode, the pencil icon turns into a pointer icon. | |
| + | {{NoteFormat|If Write Mode is disabled by administrators, you will not see the pencil icon.|1}} | ||
| − | + | |textwide=In Write Mode, you can navigate by clicking links in the web page or by using the following navigation options in Workspace Web Edition: | |
| − | + | * Click the back and forward arrows. | |
| + | * Type a URL into the URL bar and press the '''Enter''' key. | ||
| + | * Click the refresh button to reload the page. | ||
| − | + | Administrators can limit which interactive elements are enabled for you in Write Mode. For example, administrators may choose to disable certain links. By default, all <b>Submit</b> buttons are deactivated for agents and nothing happens when you click one. Customers can always submit forms as if they were browsing normally. | |
| − | |||
| − | |||
| − | + | '''Important:''' You can only co-browse while the customer is on your company's site. If the customer goes to another site, the co-browse session stops until they come back to your site. | |
| − | |||
| − | ''' | ||
<br> | <br> | ||
|media1=WWE_GCB_Switching_to_write_mode.png | |media1=WWE_GCB_Switching_to_write_mode.png | ||
| Ligne 64 : | Ligne 62 : | ||
{{CloudStep_Stack | {{CloudStep_Stack | ||
| − | |title= | + | |title=Switch back to Pointer Mode |
| − | |text= | + | |text= To switch to back to Pointer Mode, click the pointer icon at the top right corner of the Co-browse area. |
| − | + | The customer can also switch back to Pointer Mode at any time. | |
|media1=WWE_GCB_Switching_to_pointer_mode.png | |media1=WWE_GCB_Switching_to_pointer_mode.png | ||
}} | }} | ||
{{CloudStep_Stack | {{CloudStep_Stack | ||
| − | |title= | + | |title=Stop a Co-browse session |
| − | |text= | + | |text=Once a Co-browse session starts, both you and the customer have the ability to end the session with the '''Exit Session''' button. |
| − | + | You can also end the Co-browsing session by ending your ongoing chat or call with the customer. | |
| − | + | If the customer exits the session, you are notified and your browser no longer displays a view of the customer's browser. Likewise, if you exit the session, the customer receives a notification. | |
|media1=WWE_GCB_Stopping_a_session.png | |media1=WWE_GCB_Stopping_a_session.png | ||
| Ligne 83 : | Ligne 81 : | ||
{{CloudStep_Stack | {{CloudStep_Stack | ||
| − | |title= | + | |title=Manage your virtual browser |
| − | |text= | + | |text=The size of your virtual browser (a window on your computer that displays the customer's browser window) matches the actual size at the customer's end. Scroll bars appear to help you navigate the customer's browser if their window is bigger than your Workspace Web Edition Co-browse area. |
| − | + | ====Data masking==== | |
| − | ==== | + | Administrators can limit which fields are readable to you; asterisks (****) display anywhere that characters are masked. For example, administrators might choose to mask only the customer's password and social security number—or an entire page—from all agents. |
| − | |||
|media1=WWE_GCB_Participating_in_a_session_2.png | |media1=WWE_GCB_Participating_in_a_session_2.png | ||
Version du octobre 24, 2017 à 17:40
Co-browse sessions
A Genesys Co-browse session lets you and a customer navigate the same web page at the same time. Unlike conventional screen-sharing applications where one party sees an image of the other party's browser, in a Genesys Co-browse session both you and the customer share the same instance of the web page.
Sommaire
Start a Co-browse session
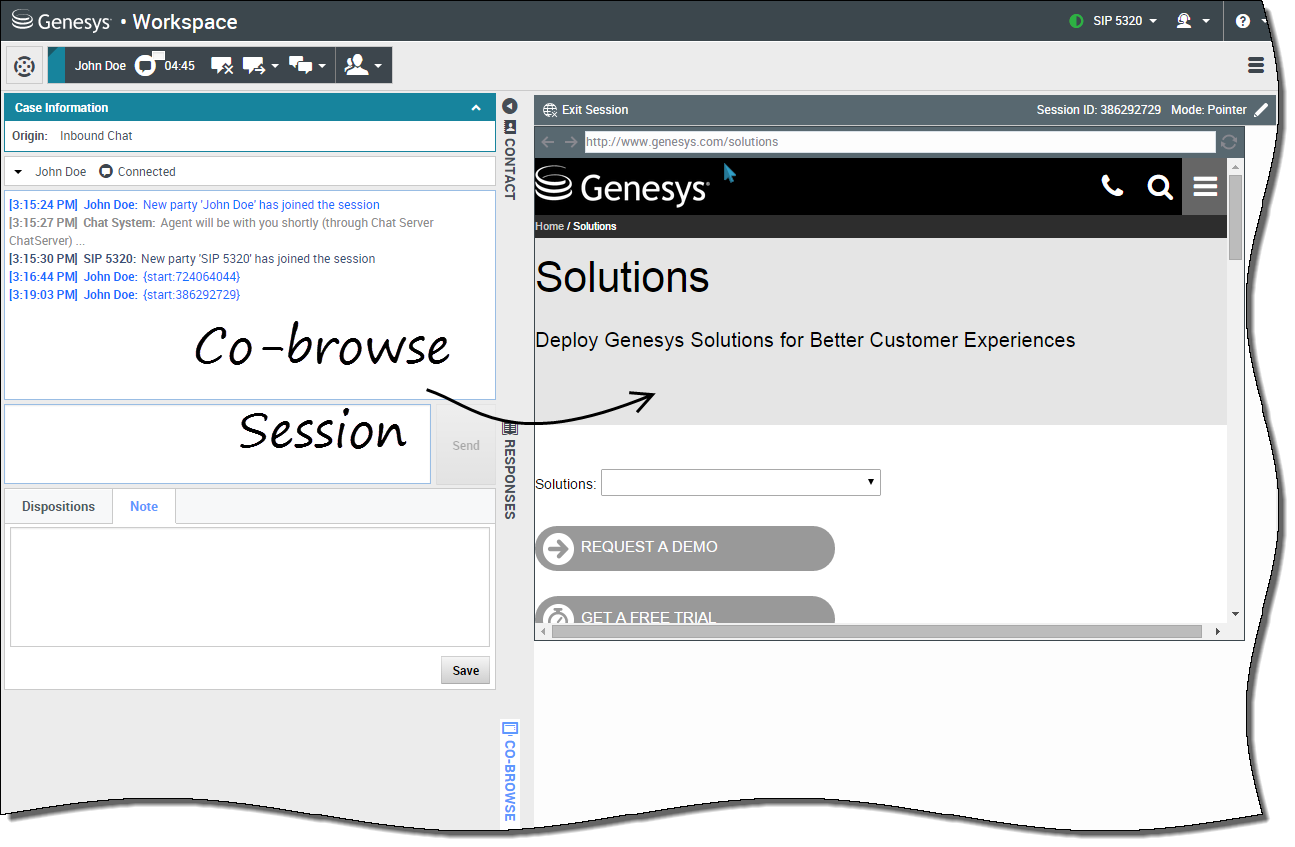
The customer must initiate a Co-browsing session. You cannot start a Co-browse session. Websites set up for Genesys Co-browse include a Co-browsing button that the customer must click to start a Co-browsing session.
Clicking the Co-browsing button will present the customer with a session ID. If you are engaged in chat with the customer, the Co-browse session will automatically start in your workspace. Once the Co-browsing session starts, you see a special message in chat—{start:123123123} for example, where 123123123 is the session ID.
Note: For security considerations, you will only see a placeholder of certain website elements.
Start a Co-browse session using a session ID
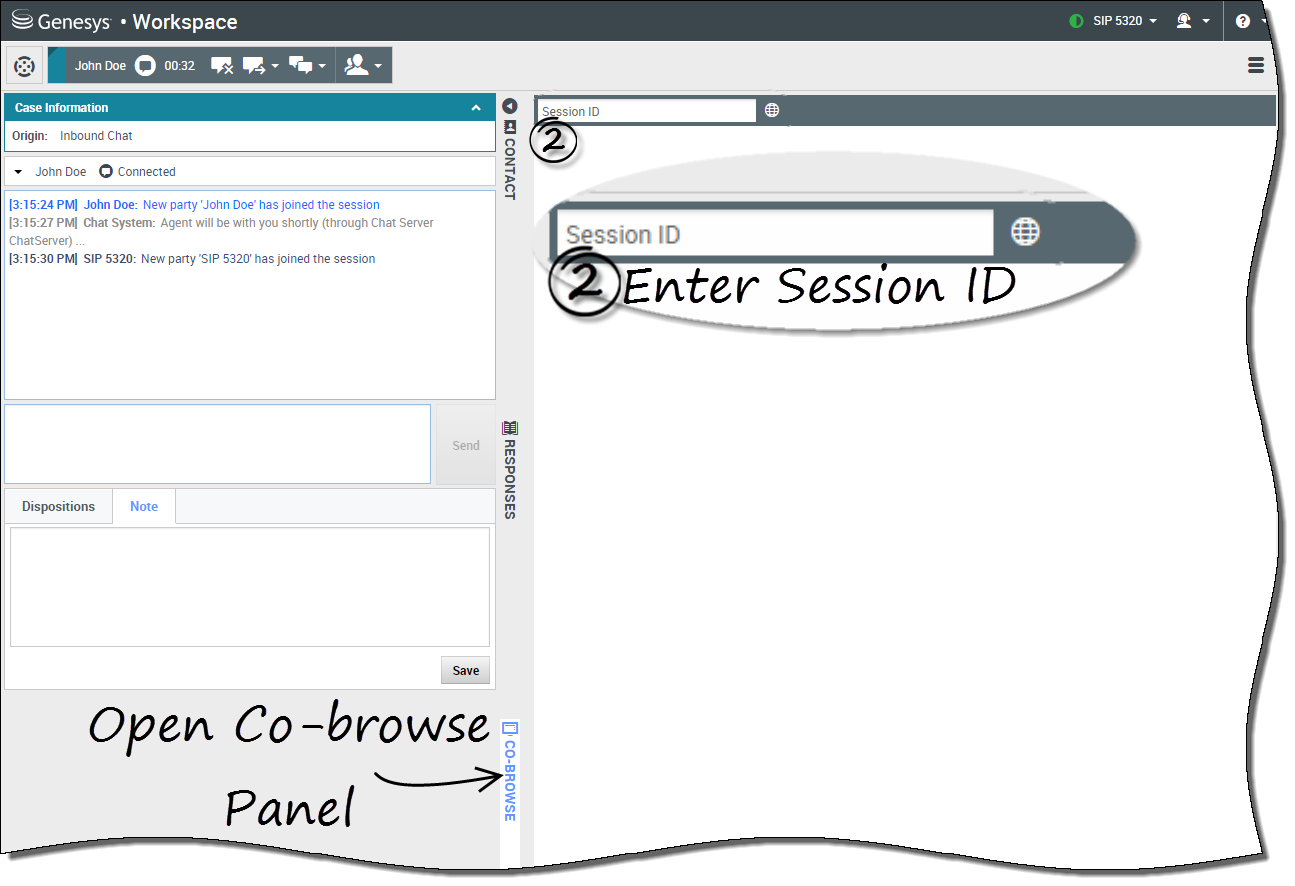
If you are on a call or a chat and your Co-browse session does not automatically start, you can use a session ID to start a Co-browsing session.
Get the session ID from the customer and enter it in the Session ID field, then click the globe icon.
You should now see the customer's browser. You do not need to navigate to the same page as the customer. Co-browse uses the session ID to make sure that you and the customer are viewing the same page. As soon as the session starts, the customer receives a notification on their screen that they have started a Co-browsing session.
Note: Genesys Co-browse does not support conference or transfer for chat and voice.
Use Pointer Mode
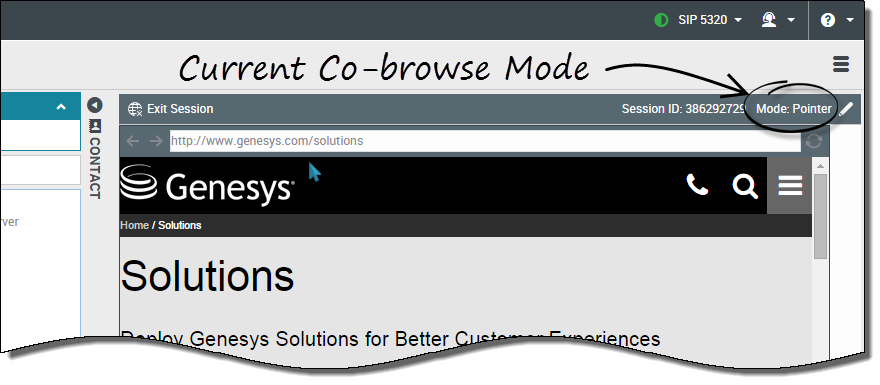
When you first join a Co-browse session, you are in Pointer Mode. You can see what the customer sees but you cannot perform any actions in their browser. You cannot navigate, input information, or submit forms.
You and the customer can see each other's mouse movements at all times and your mouse clicks create a red circle effect around your mouse pointer. Use the red circle effect to direct the customer to specific sections on the web page.
At any time, you can send a request to the customer to enable Write Mode.
Switch to Write Mode
In Write Mode, both you and the customer can perform conventional user actions. Both of you can enter text and click buttons.
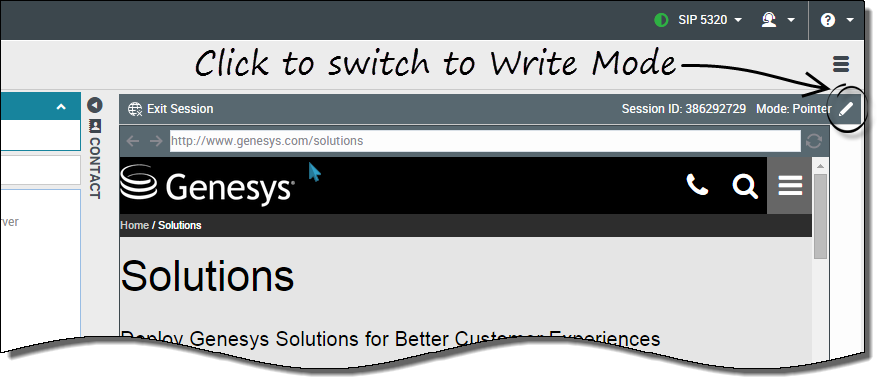
To switch to Write Mode, click the pencil icon at the top right corner of the Co-browse area. The customer is asked to approve the switch to Write Mode. Write Mode is enabled only if the customer approves. You receive a notification about the customer's response.
If the customer approves the switch to Write Mode, the pencil icon turns into a pointer icon.
- Click the back and forward arrows.
- Type a URL into the URL bar and press the Enter key.
- Click the refresh button to reload the page.
Administrators can limit which interactive elements are enabled for you in Write Mode. For example, administrators may choose to disable certain links. By default, all Submit buttons are deactivated for agents and nothing happens when you click one. Customers can always submit forms as if they were browsing normally.
Important: You can only co-browse while the customer is on your company's site. If the customer goes to another site, the co-browse session stops until they come back to your site.
Switch back to Pointer Mode
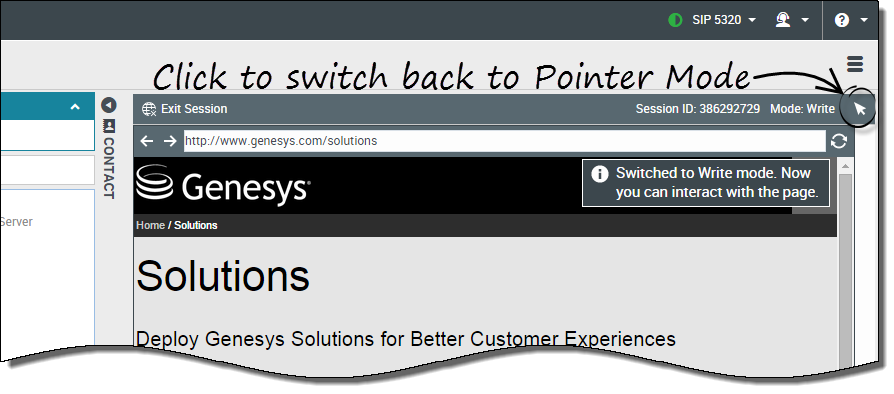
To switch to back to Pointer Mode, click the pointer icon at the top right corner of the Co-browse area.
The customer can also switch back to Pointer Mode at any time.
Stop a Co-browse session
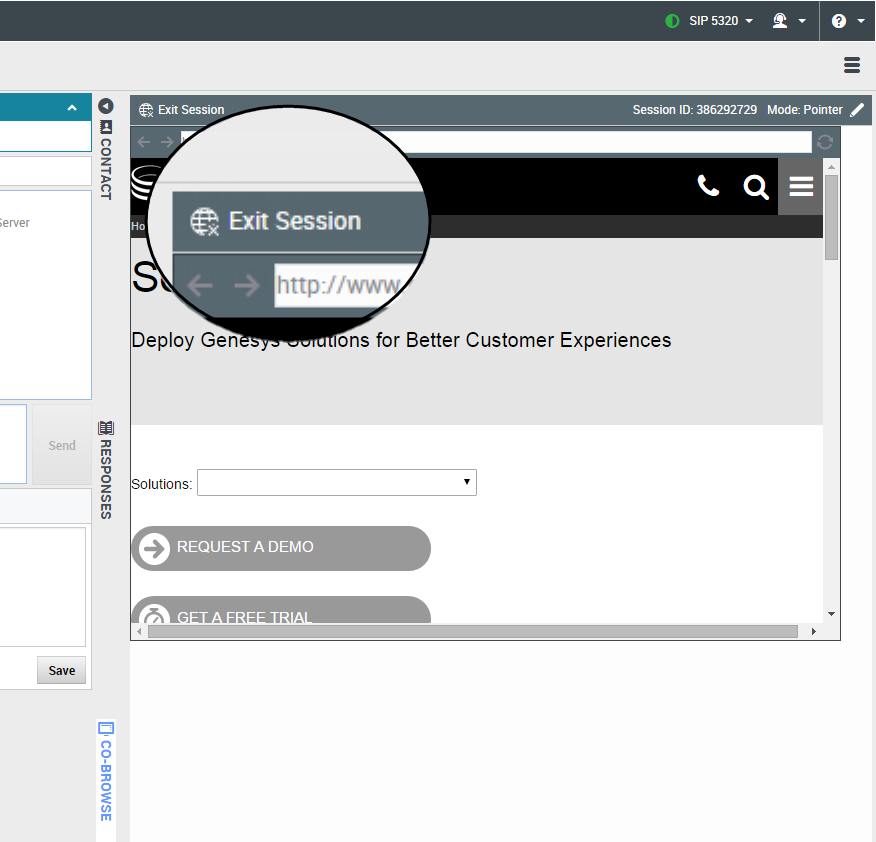
Once a Co-browse session starts, both you and the customer have the ability to end the session with the Exit Session button.
You can also end the Co-browsing session by ending your ongoing chat or call with the customer.
If the customer exits the session, you are notified and your browser no longer displays a view of the customer's browser. Likewise, if you exit the session, the customer receives a notification.
Manage your virtual browser
The size of your virtual browser (a window on your computer that displays the customer's browser window) matches the actual size at the customer's end. Scroll bars appear to help you navigate the customer's browser if their window is bigger than your Workspace Web Edition Co-browse area.
Data masking
Administrators can limit which fields are readable to you; asterisks (****) display anywhere that characters are masked. For example, administrators might choose to mask only the customer's password and social security number—or an entire page—from all agents.

