(Update with the copy of version: 9.0DRAFT) |
m (1 révision importée) |
||
| Ligne 1 : | Ligne 1 : | ||
| − | = | + | =Manage Report Templates= |
| − | |||
<onlyinclude> | <onlyinclude> | ||
| − | + | You can create and use templates to simplify widget creation? Any users with the appropriate privileges can create or modify the templates. You can then create various widgets using your report template. | |
__TOC__ | __TOC__ | ||
{{CloudStep_Stack | {{CloudStep_Stack | ||
| − | |title= | + | |title=Settings |
| − | |text= | + | |text=To manage shared widget templates, select '''Manage'''. |
| − | + | The easiest way to create a template is to clone and edit an existing widget template within Genesys Pulse. Genesys Pulse provides a basic set of predefined templates, complete with statistics that are typical for reporting activities handled by Genesys solutions. Any users with the appropriate privileges can create or modify the available templates. | |
| − | + | To create a widget template, you must add or configure: | |
| − | * | + | * One or more object types. |
| − | * | + | * One or more statistics (at least one non-string statistic). |
| − | * | + | * One widget type with specific options to display the information. |
| − | {{NoteFormat| | + | You can hide or unhide the statistics and display options when you create or edit widgets. |
| + | {{NoteFormat|You can clone the <tt>Text Widget</tt> template to create your own presets for further use.|2}} | ||
| + | {{NoteFormat|You can edit only user-created templates, unless the '''editable_templates''' option in the '''[pulse]''' section of the Genesys Pulse Application object is set to <tt>true</tt>. Genesys Pulse overwrites any changes made to predefined templates with the original predefined templates every time Genesys Pulse starts, unless you set the '''[pulse]'''/'''install_templates''' option to <tt>false</tt>.}} | ||
| − | + | |media1=Pulse9.0WidgetTemplate.png | |
| − | |||
| − | |media1= | ||
}} | }} | ||
{{CloudStep_Stack | {{CloudStep_Stack | ||
| − | |title= | + | |title=Hide templates from other users |
| − | |text= | + | |text=When you create your widget templates you can choose to prevent others from seeing and using your templates. |
| − | {{NoteFormat| | + | {{NoteFormat|To prevent other users from using your widget templates, you must have the GAX permissions: Access Configmanager; Read Scripts; and Create/Full Control of Scripts.}} |
| − | + | When you save your templates, choose the option '''Save to Genesys Configuration Server'''. | |
| − | + | Then, from the template management, click '''Link to Configuration Manager''' on the right under '''Access Groups'''. | |
| − | + | From here, you can define what permissions people have for your templates. | |
| − | |media1= | + | |media1=Pulse9.0HideTemplate.png |
}} | }} | ||
{{CloudStep_Stack | {{CloudStep_Stack | ||
| − | |title= | + | |title=Select statistics |
| − | |text= | + | |text=Within the Genesys Pulse statistic definition, you can specify statistic parameters regardless of whether they are available on any Stat Server in your environment. This means you must also update the Stat Server options to ensure that the Stat Server connected to Genesys Pulse contains the corresponding options (for example, statistic types and filters). You can show or hide statistics as needed. |
| − | + | You must add at least one non-string statistic. | |
| − | + | Choose the statistics and [[RTRStatProperties|properties]] to include in your template. See [[RTRTemplatesA|report templates and statistics details]]. | |
| − | + | Genesys Pulse displays statistic details when you select a statistic. This information includes the components of the StatType definition and other parameters that form the request that Genesys Pulse sends to Stat Server. You can modify a statistic definition within Genesys Pulse when you create, clone, or edit a template. | |
|media1=Pulse_85105_PredefStat.png | |media1=Pulse_85105_PredefStat.png | ||
| Ligne 53 : | Ligne 52 : | ||
{{CloudStep_Stack | {{CloudStep_Stack | ||
| − | |title= | + | |title=Statistics Group by Columns |
| − | |text= | + | |text=First, the StatType with '''GroupBy''' and '''GroupByColumns''' must be defined in Stat Server Options. |
| − | + | Once the statistics are defined, you can create a template with that statistic using the '''Group by Columns''' field. See '''GroupBy''' on the [[RTRStatProperties|Statistic Properties page]]. | |
| − | + | You can then create widgets using this new template. | |
|media1=Pulse_85105_StatGroupBy.png | |media1=Pulse_85105_StatGroupBy.png | ||
| Ligne 64 : | Ligne 63 : | ||
{{CloudStep_Stack | {{CloudStep_Stack | ||
| − | |title= | + | |title=Select Collectors |
| − | |text= | + | |text=Starting with release 8.5.108, Genesys Pulse allows users to assign specific Genesys Pulse Collectors to handle all widgets based on this template. To enable this functionality, you need to set the '''enable_manual_collector_binding''' option to <tt>true</tt> in the '''[pulse]''' section of the Genesys Pulse Application object and assign the role with the <tt>Pulse Manually Bind Collectors</tt> privilege to selected users. |
| − | + | On the screenshot you can see Site 1 and Site 2 as it is a multisite configuration. For a singlesite configuration there will be only one site. | |
| − | + | ||
| − | + | |media1=Pulse_85108_TemplateSelectCollectors.png | |
| − | |||
| − | |||
| − | |||
| − | |||
| − | |media1= | ||
}} | }} | ||
{{CloudStep_Stack | {{CloudStep_Stack | ||
| − | |title= | + | |title=Display options |
| − | |text= | + | |text=Define the display options of your report widget to validate your template. This is what users see, but they can then [[RTRUserAccess#scrollNav-5|change the options on their own dashboard]] while they [[RTRWidgets|create]] or edit widgets. |
| + | * Name the report widget and provide title. | ||
| + | * Select the [[RTRWidgetTypes|Widget Type]] to display. | ||
| + | * Select additional available options. <br> '''Note:''' The maximum value for the bar charts in List and KPI widgets is the maximum value of all the objects selected for the statistic in this widget or the maximum value of the alert configured for this widget. | ||
| + | * Select options associated with the visualization (for example, size). | ||
| + | * Optional: For templates configured to use changes-based statistics (CurrentStatus and ExtendedCurrentStatus), set '''enable quick updates'''. See [https://docs.genesys.com/Documentation/EZP/{{ponydocsversion}}/Deploy/RabbitMQ Deploying RabbitMQ for Quick Widget Updates]. | ||
| + | |||
| + | {{NoteFormat|Confirm your environment can handle the number of widgets and refresh rate you plan to use. A shorter refresh rate increases demands on the CPU, memory, disk, and network.}} | ||
| − | {{NoteFormat| | + | {{NoteFormat|The Line widget type is not available in the Template Wizard. You can choose this type when you create a widget with individually (not By Group) selected objects.|2}} |
| − | + | |media1=Pulse_9.0_DisplayOptions.png | |
| − | |||
| − | |||
| − | |||
| − | |media1= | ||
}} | }} | ||
{{CloudStep_Stack | {{CloudStep_Stack | ||
| − | |title= | + | |title=Alerts |
| − | |text= | + | |text=Starting with release 9.0.000, Alerts can be used to specify thresholds (red, orange, and green) for each numerical statistic (Time, Integer, Percentage, or Number format) in the '''Alerts for Statistic'''. Decimal values can be specified as threshold values for Number/Percentage statistics, and integer values for other statistics. |
| − | + | ||
| − | * | + | {{NoteFormat|Only numerical non-formula-based statistics (Time, Integer, Percentage, or Number format) with the <tt>Time-Based</tt> or <tt>Reset-Based</tt> notification mode are available in the '''Advanced Alerts'''.|3}} |
| − | * | + | |
| − | + | Specify the complex condition in the <tt>Advanced Alerts</tt> section when you need to use more than one statistic or send email notifications. The <tt>Advanced Alerts</tt> section has the following two modes: | |
| − | |media1= | + | * '''Builder'''. Simplifies building basic conditions. |
| + | * '''Advanced'''. Allows to build complex condition by assigning the boolean, number or string value to the <tt>Result</tt> variable using any valid JavaScript expressions. | ||
| + | The <tt>Advanced Alerts</tt> section might not be available in certain Genesys Pulse configurations. See [https://docs.genesys.com/Documentation/EZP/{{ponydocsversion}}/Deploy/Microservices Microservices] for more information. | ||
| + | |media1=Pulse_900_TemplateAlertsTab.png | ||
}} | }} | ||
{{CloudStep_Stack | {{CloudStep_Stack | ||
| − | |title= | + | |title=Propagate template changes |
| − | |text= | + | |text=When editing is finished and you click '''Save''', Genesys Pulse displays a list of all user widgets that use the template. Genesys Pulse lists the titles and owners of the widgets. |
| − | + | *Select which widgets should be updated. | |
| − | + | *If needed, Genesys Pulse provides the <tt>Overwrite Display Options and Alerts for selected widgets</tt> checkbox. | |
| − | + | ** If you select the checkbox, Genesys Pulse updates the widget type, headline, all other display options in the widgets (except refresh rate) and configuration of Alerts for statistics, as well as the statistic definitions and allowed object types. | |
| − | |media1= | + | **If you do not select the checkbox, Genesys Pulse updates only the statistic definitions and allowed object types. |
| + | {{NoteFormat|Changes in Advanced Alerts are not propagated.}} | ||
| + | |media1=Pulse9.0PropagateTemplateChanges.png | ||
}} | }} | ||
| − | + | ==What do I do next?== | |
| − | + | You might want to learn more about: | |
| − | + | * [[RTRWidgetTypes|Widget Types]] | |
| − | * [[RTRWidgetTypes|Types | + | * [[RTRReports|Popular real-time reports]] |
| − | * [[RTRReports| | + | * [[RTRWidgetExternal|Displaying external content using an IFRAME widget]] |
| − | * [[RTRWidgetExternal| | + | *[[RTRStatProperties|Statistic properties]] |
| − | *[[RTRStatProperties| | + | *[[RTRFormulas|Report formulas]] |
| − | *[[RTRFormulas| | + | *[[RTRFunctions|Template function library]] |
| − | *[[RTRFunctions| | ||
Version du février 12, 2020 à 00:44
Manage Report Templates
You can create and use templates to simplify widget creation? Any users with the appropriate privileges can create or modify the templates. You can then create various widgets using your report template.
Sommaire
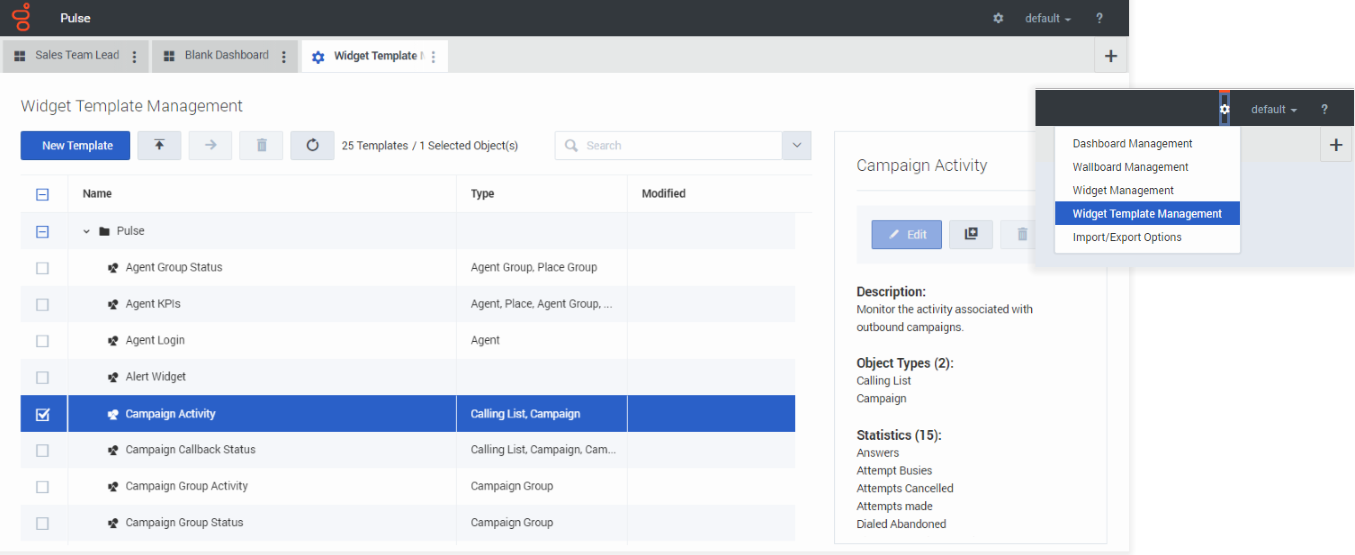
Settings
To manage shared widget templates, select Manage.
The easiest way to create a template is to clone and edit an existing widget template within Genesys Pulse. Genesys Pulse provides a basic set of predefined templates, complete with statistics that are typical for reporting activities handled by Genesys solutions. Any users with the appropriate privileges can create or modify the available templates.
To create a widget template, you must add or configure:
- One or more object types.
- One or more statistics (at least one non-string statistic).
- One widget type with specific options to display the information.
You can hide or unhide the statistics and display options when you create or edit widgets.
Hide templates from other users
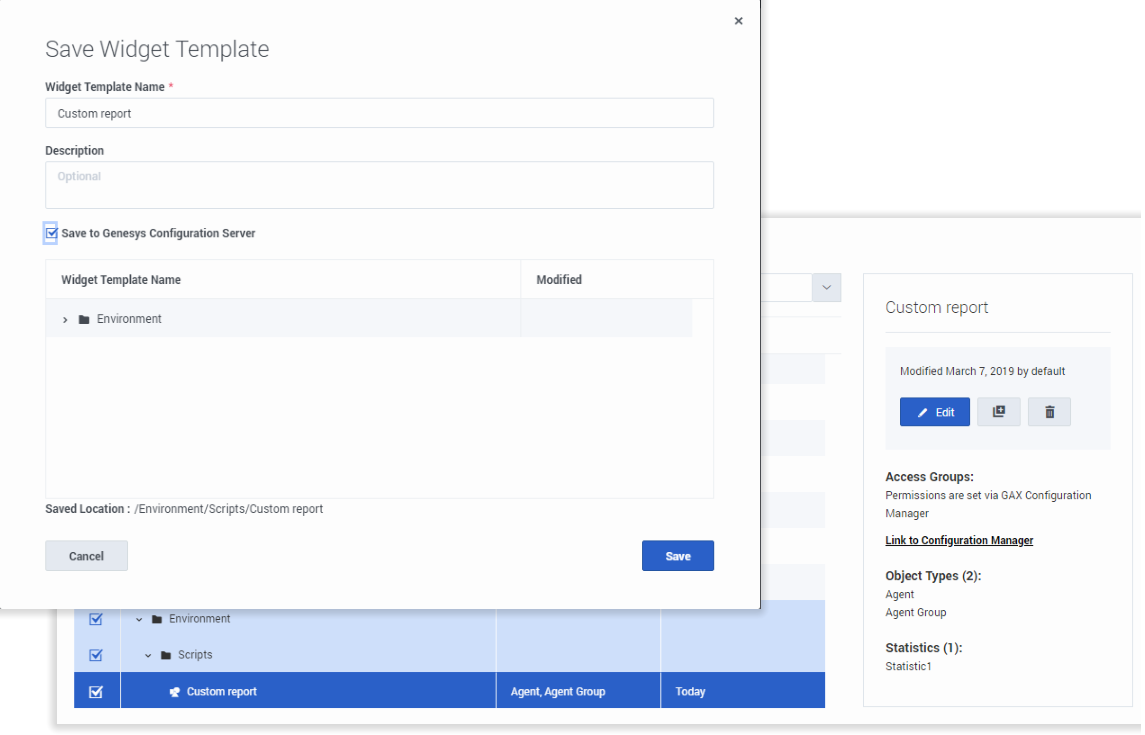
When you create your widget templates you can choose to prevent others from seeing and using your templates.
When you save your templates, choose the option Save to Genesys Configuration Server.
Then, from the template management, click Link to Configuration Manager on the right under Access Groups.
From here, you can define what permissions people have for your templates.
Select statistics
Within the Genesys Pulse statistic definition, you can specify statistic parameters regardless of whether they are available on any Stat Server in your environment. This means you must also update the Stat Server options to ensure that the Stat Server connected to Genesys Pulse contains the corresponding options (for example, statistic types and filters). You can show or hide statistics as needed.
You must add at least one non-string statistic.
Choose the statistics and properties to include in your template. See report templates and statistics details.
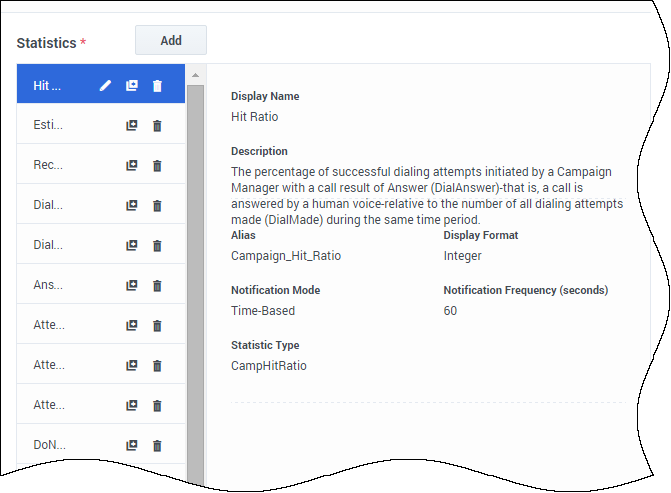
Genesys Pulse displays statistic details when you select a statistic. This information includes the components of the StatType definition and other parameters that form the request that Genesys Pulse sends to Stat Server. You can modify a statistic definition within Genesys Pulse when you create, clone, or edit a template.
Statistics Group by Columns
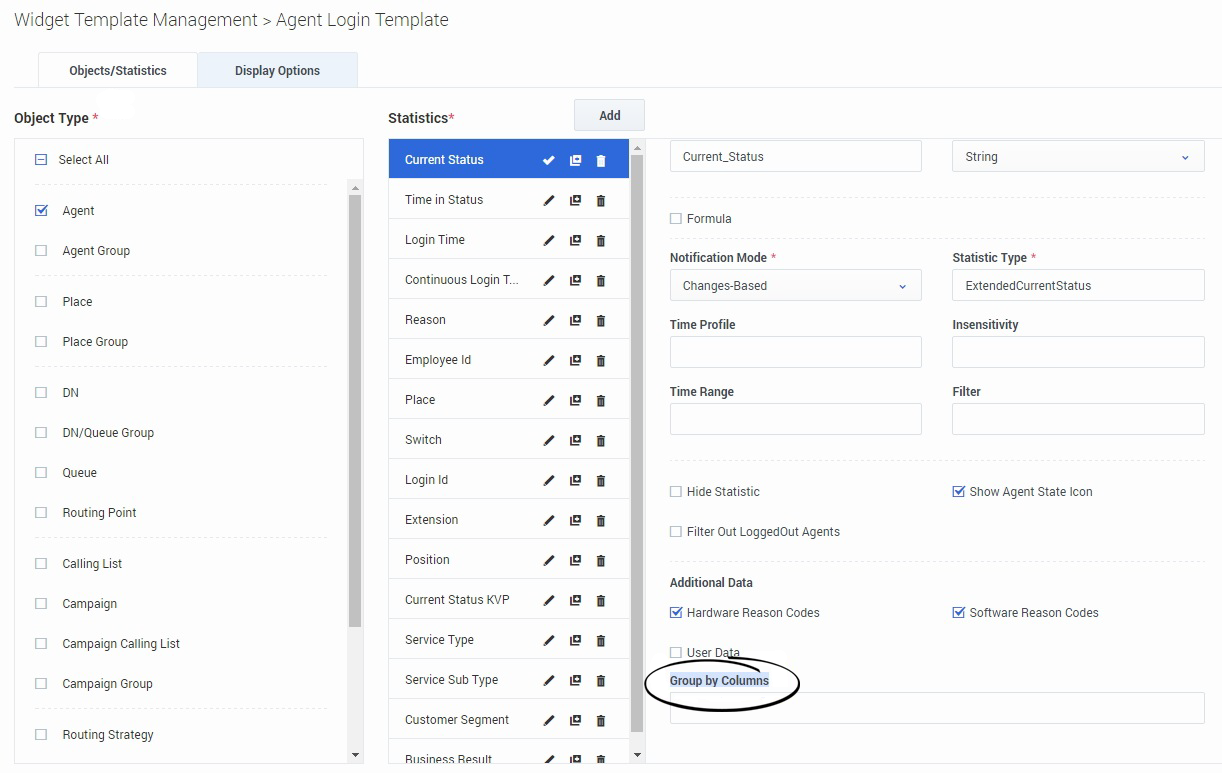
First, the StatType with GroupBy and GroupByColumns must be defined in Stat Server Options.
Once the statistics are defined, you can create a template with that statistic using the Group by Columns field. See GroupBy on the Statistic Properties page.
You can then create widgets using this new template.
Select Collectors
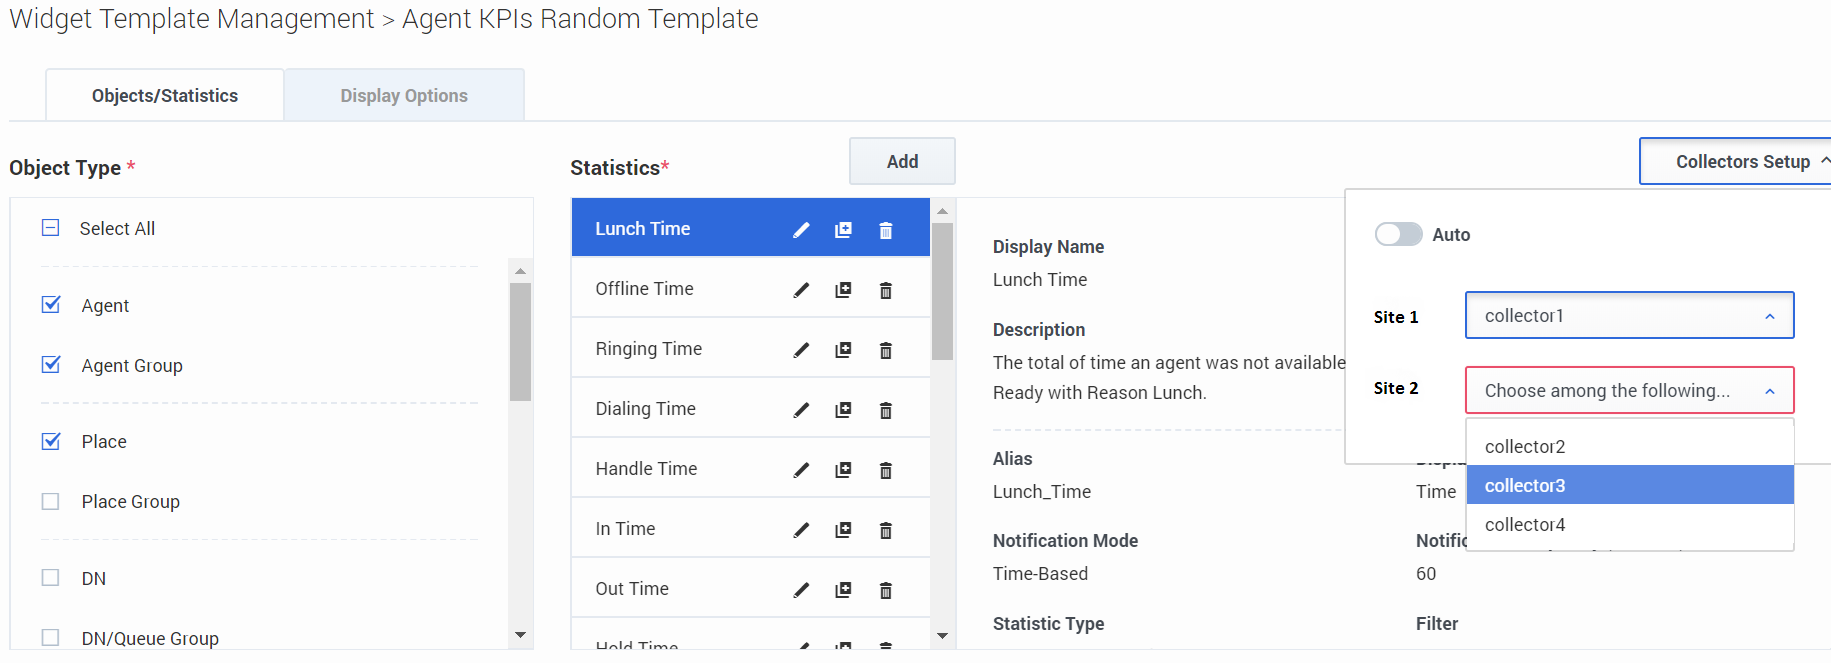
Starting with release 8.5.108, Genesys Pulse allows users to assign specific Genesys Pulse Collectors to handle all widgets based on this template. To enable this functionality, you need to set the enable_manual_collector_binding option to true in the [pulse] section of the Genesys Pulse Application object and assign the role with the Pulse Manually Bind Collectors privilege to selected users.
On the screenshot you can see Site 1 and Site 2 as it is a multisite configuration. For a singlesite configuration there will be only one site.
Display options
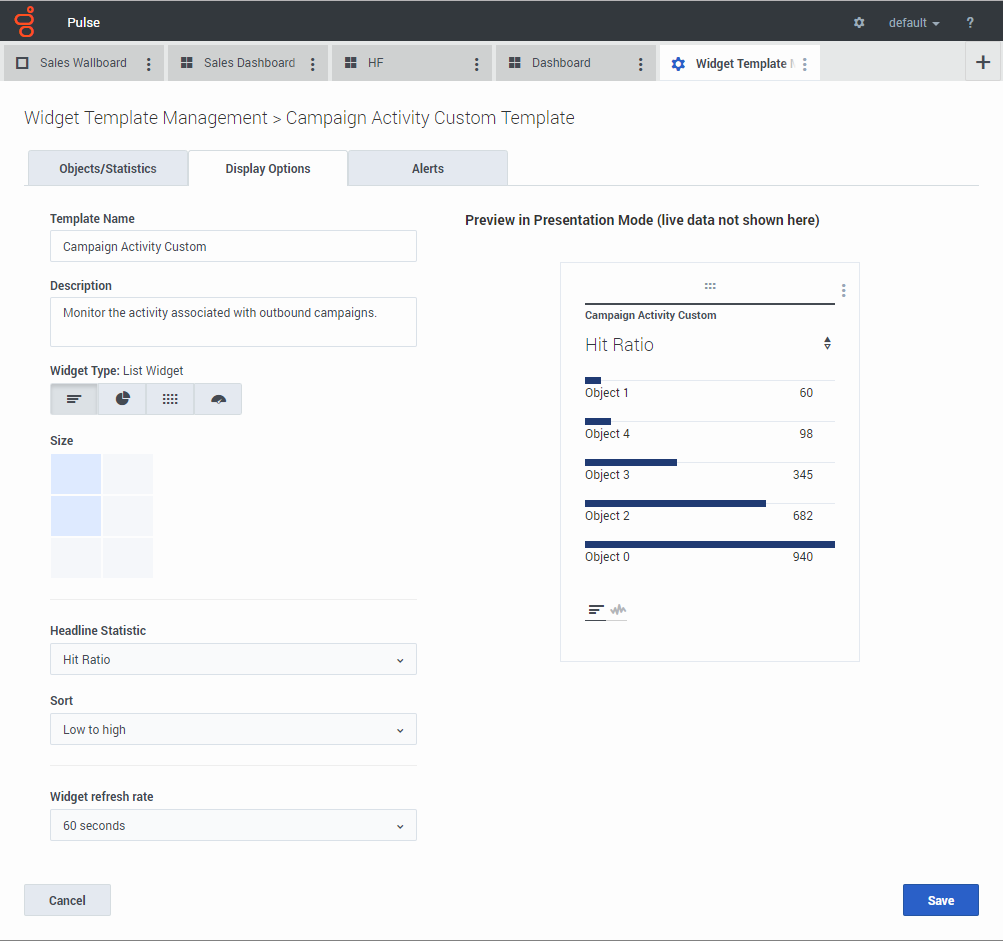
Define the display options of your report widget to validate your template. This is what users see, but they can then change the options on their own dashboard while they create or edit widgets.
- Name the report widget and provide title.
- Select the Widget Type to display.
- Select additional available options.
Note: The maximum value for the bar charts in List and KPI widgets is the maximum value of all the objects selected for the statistic in this widget or the maximum value of the alert configured for this widget. - Select options associated with the visualization (for example, size).
- Optional: For templates configured to use changes-based statistics (CurrentStatus and ExtendedCurrentStatus), set enable quick updates. See Deploying RabbitMQ for Quick Widget Updates.
Alerts
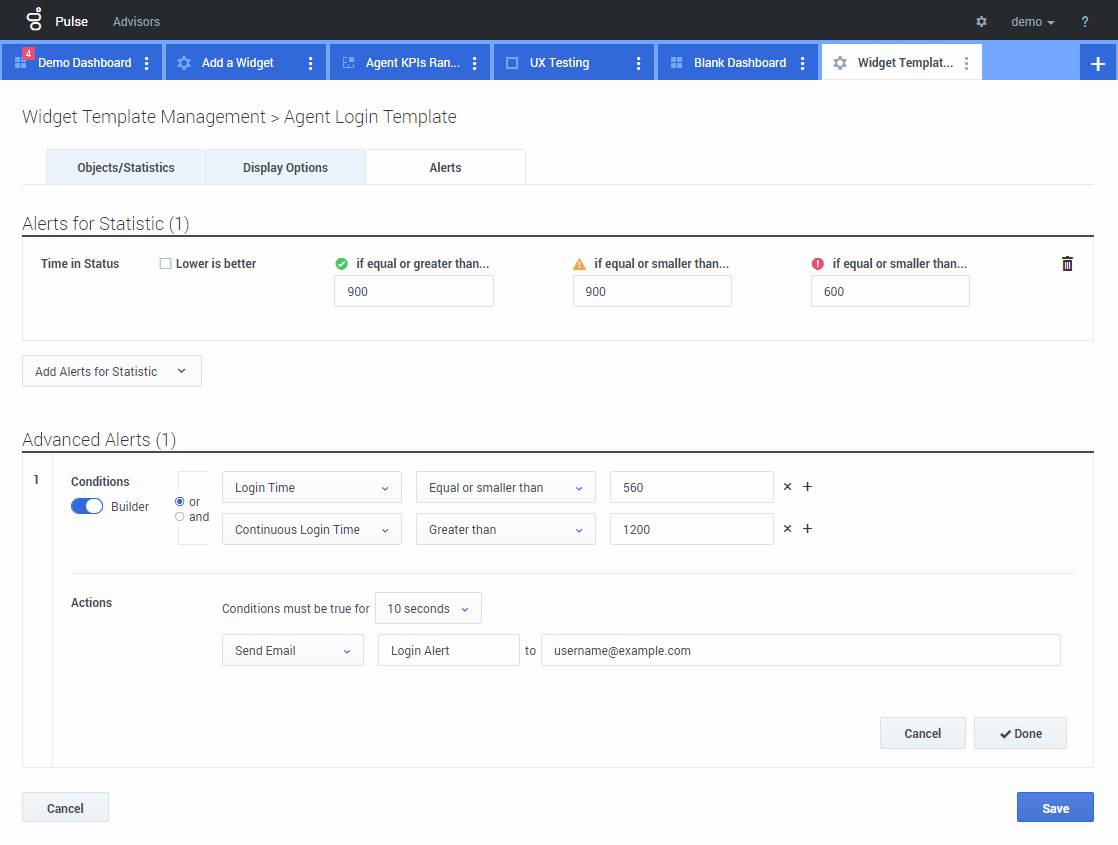
Starting with release 9.0.000, Alerts can be used to specify thresholds (red, orange, and green) for each numerical statistic (Time, Integer, Percentage, or Number format) in the Alerts for Statistic. Decimal values can be specified as threshold values for Number/Percentage statistics, and integer values for other statistics.
Specify the complex condition in the Advanced Alerts section when you need to use more than one statistic or send email notifications. The Advanced Alerts section has the following two modes:
- Builder. Simplifies building basic conditions.
- Advanced. Allows to build complex condition by assigning the boolean, number or string value to the Result variable using any valid JavaScript expressions.
The Advanced Alerts section might not be available in certain Genesys Pulse configurations. See Microservices for more information.
Propagate template changes
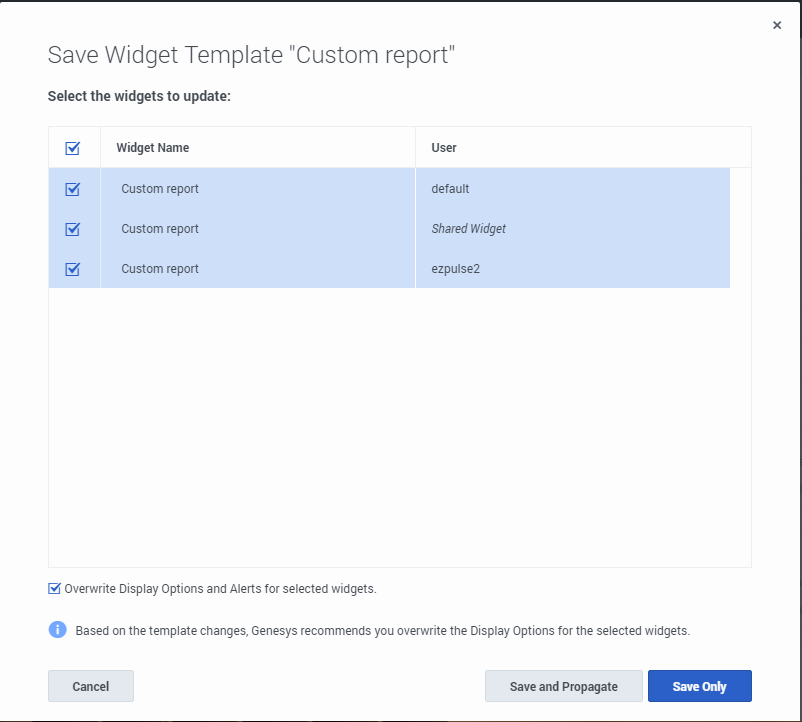
When editing is finished and you click Save, Genesys Pulse displays a list of all user widgets that use the template. Genesys Pulse lists the titles and owners of the widgets.
- Select which widgets should be updated.
- If needed, Genesys Pulse provides the Overwrite Display Options and Alerts for selected widgets checkbox.
- If you select the checkbox, Genesys Pulse updates the widget type, headline, all other display options in the widgets (except refresh rate) and configuration of Alerts for statistics, as well as the statistic definitions and allowed object types.
- If you do not select the checkbox, Genesys Pulse updates only the statistic definitions and allowed object types.
What do I do next?
You might want to learn more about:

