(Update with the copy of version: 9.0DRAFT) |
m (1 révision importée) |
||
| Ligne 1 : | Ligne 1 : | ||
| − | = | + | =Dashboards and Wallboards = |
| − | + | Use Pulse dashboards and wallboards to display real-time reports within widgets, so that you can monitor your contact center to suit your needs. | |
| − | |||
| − | + | Dashboards are for personal use, and provide drill-down reports and contain more detail than a wallboard. | |
| − | + | Wallboards can broadcast information on a large screen for a team of people. You can use only KPI widgets on your wallboards. | |
{{CloudStep_Stack | {{CloudStep_Stack | ||
| − | |title= | + | |title=Add a dashboard or wallboard |
| − | |text= | + | |text=To open or create a new dashboard or wallboard, click '''Add a Dashboard'''. |
| − | + | Then you can choose between a dashboard and a wallboard. | |
| − | + | The wizard guides you through the rest of the steps. | |
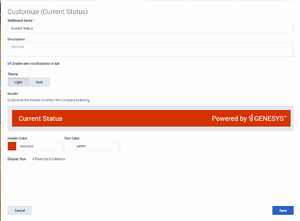
| − | + | Once a dashboard or wallboard is created you can edit the title and set other options, such as Alert Notifications or the wallboard color theme. Select '''Customize''' from the dashboard menu to adjust settings. <br> | |
| + | [[File:Pulse9.0Customize.png|thumbnail]] | ||
| − | |media1= | + | |media1=Pulse9.0AddDashboard.png |
}} | }} | ||
{{CloudStep_Stack | {{CloudStep_Stack | ||
| − | |title= | + | |title=Display wallboard data in full-screen mode |
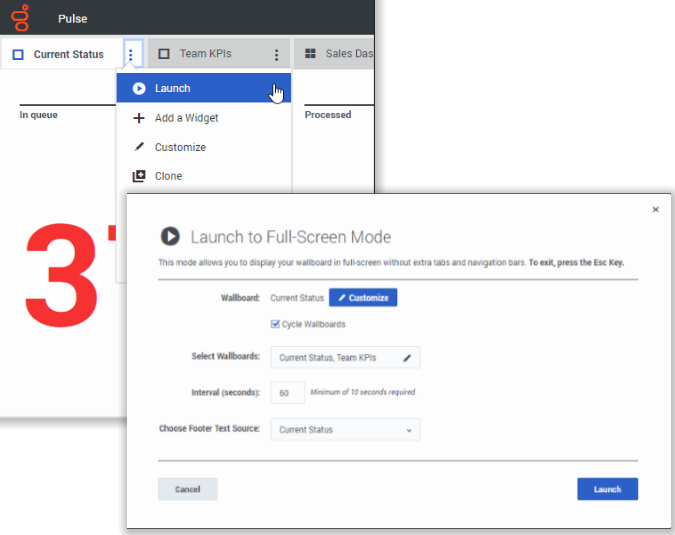
| − | |text= | + | |text=Select '''Launch''' from the wallboard More menu to display the data in full-screen mode. |
| − | + | You can choose several wallboards to cycle. You can use pinned to the bottom [[RTRWidgetTypes#Text_widget|Text Widget]] as a news ticker. This Footer Text Source (pinned Text Widget) will remain unchanged while wallboards are cycling. | |
| − | + | |media1=Pulse9.0LanchFullscreen.png | |
| − | |||
| − | |||
| − | |||
| − | |media1= | ||
}} | }} | ||
{{CloudStep_Stack | {{CloudStep_Stack | ||
| − | |title= | + | |title=Manage shared dashboards and wallboards |
| − | |text= | + | |text=To manage shared dashboards and wallboards select '''Manage'''. |
| + | |||
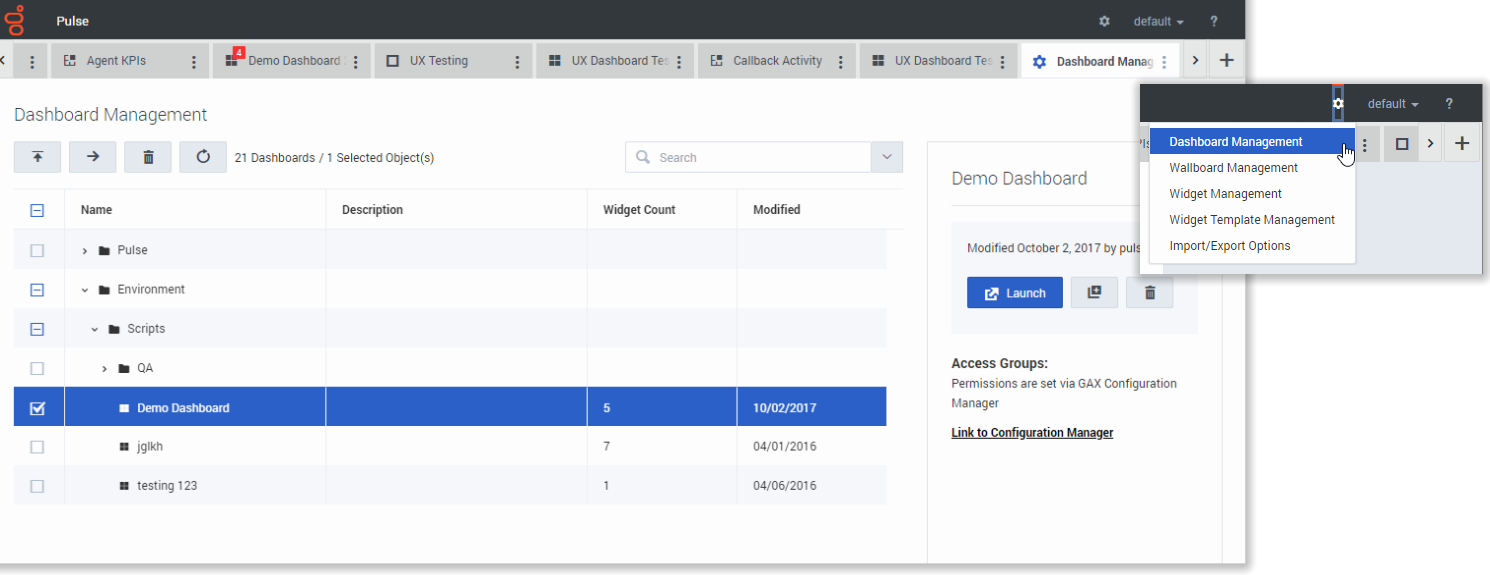
| + | From here you can perform actions on dashboards and wallboards, including assigning them to groups of users. | ||
| − | + | Genesys Pulse lists saved and shared items in a table and displays item details to the right. | |
| − | {{NoteFormat| | + | {{NoteFormat|See [[RTRTemplates|Widget Templates]] to learn how to simplify widget creation.|2}} |
| − | |media1= | + | |media1=Pulse9.0ManageDashboard.png |
}} | }} | ||
{{CloudStep_Stack | {{CloudStep_Stack | ||
| − | |title= | + | |title=Hide or share your custom dashboard or wallboard with other users |
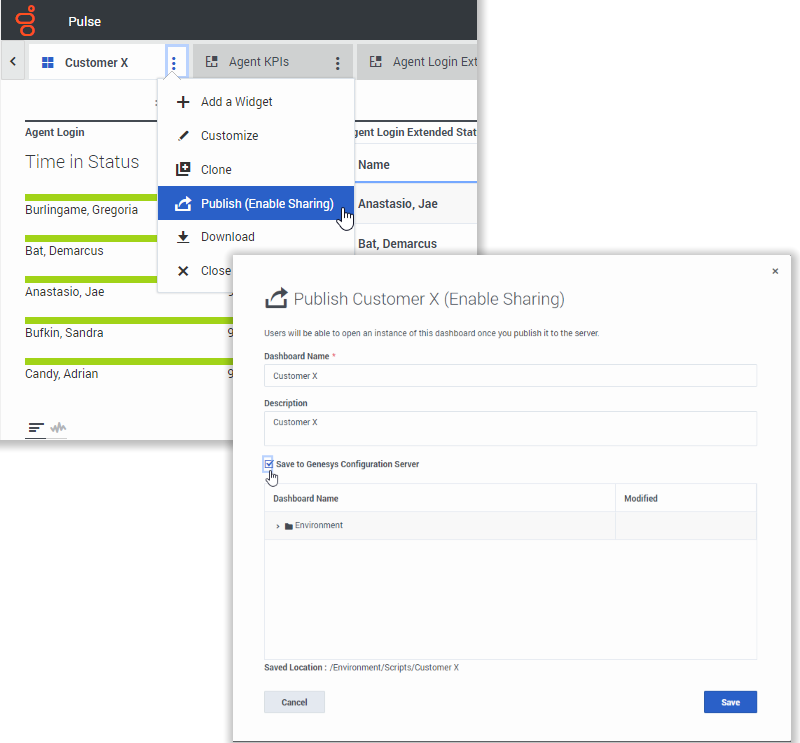
| − | |text= | + | |text=You can share your custom dashboard or wallboard with others (for example, with a user group such as Sales Team Leads). When you '''Publish''' or '''Save As''' from the more menu, you must select '''Save to Genesys Configuration Server''', and choose the directory to save and share the dashboard with others. Be sure to give it a name specific to the user's needs. |
| − | + | Use Dashboard Management to hide your dashboard from others. Select a dashboard, click '''Link to Configuration Manager''' on the right under '''Access Groups''', and set permission settings for people who will view your dashboards. | |
| − | + | {{NoteFormat|<p>To prevent others from using your dashboards, you need the GAX permissions: <tt>Access Configmanager</tt>; <tt>Read Scripts</tt>; and <tt>Create/Full Control of Scripts</tt>.</p><p>To save dashboards or wallboards to Genesys Configuration Server, you need <tt>Full Control</tt> access to the target directory.</p>}} | |
| − | |||
| − | |||
| − | |||
| − | |media1= | + | |media1=Pulse9.0SaveDashboard.png |
}} | }} | ||
{{CloudStep_Stack | {{CloudStep_Stack | ||
| − | |title= | + | |title=Allow users to customize dashboards |
| − | |text= | + | |text=Your Genesys Pulse users might want to modify their dashboards or wallboardss. You can enable this by granting them the proper permissions. |
| − | + | In GAX, on the '''Configuration Manager''' page, under '''Accounts''', go to '''Roles''' and find the role assigned to the user. | |
| − | |||
| − | |||
| − | |||
| − | |||
| − | + | Edit the privileges granted by the '''Role''' on the '''Assigned Privileges''' tab in the '''Pulse''' section to allow following actions: | |
| − | + | * '''Pulse Manage Tabs'''—User can launch and close dashboards and expand widgets to tab. | |
| − | + | * '''Pulse Edit Widget Display'''—User can modify widget display options. | |
| − | + | * '''Pulse Manage Widgets'''—User can create, remove, or modify all widget options. | |
| − | |||
| − | |||
| − | |media1= | + | |media1=Pulse9.0AssignedPrivileges.png |
}} | }} | ||
| − | + | ==What do I do next?== | |
| − | + | You might want to learn more about: | |
| − | + | * [[RTRDashboardExample|Dashboard and wallboard examples]] | |
| − | * [[RTRDashboardExample| | + | * [[RTRWidgets|Add report widgets to your dashboard or wallboard]] |
| − | * [[RTRWidgets| | + | * [[RTRReports|Popular real-time reports]] |
| − | * [[RTRReports| | + | * [[RTRWidgetExternal|Displaying external content using an IFRAME widget]] |
| − | * [[RTRWidgetExternal| | ||
[[Category:V:EZP:DRAFT]] | [[Category:V:EZP:DRAFT]] | ||
Version du février 12, 2020 à 00:44
Sommaire
Dashboards and Wallboards
Use Pulse dashboards and wallboards to display real-time reports within widgets, so that you can monitor your contact center to suit your needs.
Dashboards are for personal use, and provide drill-down reports and contain more detail than a wallboard.
Wallboards can broadcast information on a large screen for a team of people. You can use only KPI widgets on your wallboards.
Add a dashboard or wallboard
To open or create a new dashboard or wallboard, click Add a Dashboard.
Then you can choose between a dashboard and a wallboard.
The wizard guides you through the rest of the steps.
Once a dashboard or wallboard is created you can edit the title and set other options, such as Alert Notifications or the wallboard color theme. Select Customize from the dashboard menu to adjust settings.
Display wallboard data in full-screen mode
Select Launch from the wallboard More menu to display the data in full-screen mode.
You can choose several wallboards to cycle. You can use pinned to the bottom Text Widget as a news ticker. This Footer Text Source (pinned Text Widget) will remain unchanged while wallboards are cycling.
To manage shared dashboards and wallboards select Manage.
From here you can perform actions on dashboards and wallboards, including assigning them to groups of users.
Genesys Pulse lists saved and shared items in a table and displays item details to the right.
You can share your custom dashboard or wallboard with others (for example, with a user group such as Sales Team Leads). When you Publish or Save As from the more menu, you must select Save to Genesys Configuration Server, and choose the directory to save and share the dashboard with others. Be sure to give it a name specific to the user's needs.
Use Dashboard Management to hide your dashboard from others. Select a dashboard, click Link to Configuration Manager on the right under Access Groups, and set permission settings for people who will view your dashboards.
To prevent others from using your dashboards, you need the GAX permissions: Access Configmanager; Read Scripts; and Create/Full Control of Scripts.
To save dashboards or wallboards to Genesys Configuration Server, you need Full Control access to the target directory.
Allow users to customize dashboards
Your Genesys Pulse users might want to modify their dashboards or wallboardss. You can enable this by granting them the proper permissions.
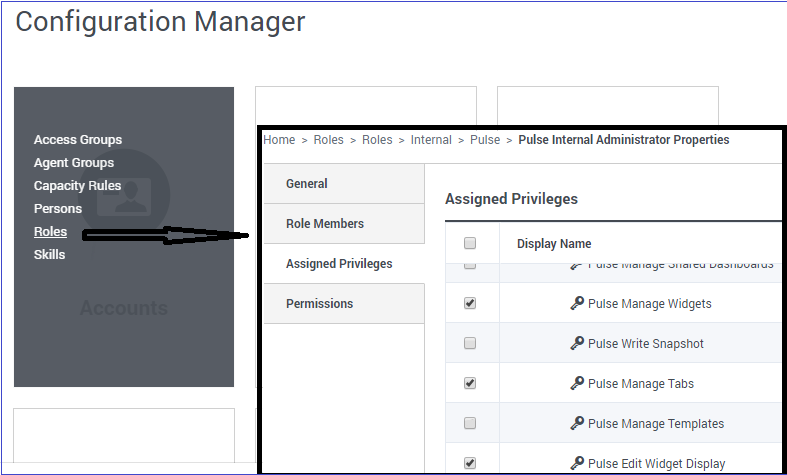
In GAX, on the Configuration Manager page, under Accounts, go to Roles and find the role assigned to the user.
Edit the privileges granted by the Role on the Assigned Privileges tab in the Pulse section to allow following actions:
- Pulse Manage Tabs—User can launch and close dashboards and expand widgets to tab.
- Pulse Edit Widget Display—User can modify widget display options.
- Pulse Manage Widgets—User can create, remove, or modify all widget options.
What do I do next?
You might want to learn more about:


