Supervising agents
Some workers at contact centers are designated to be Team Leads or Supervisors. In this role, it is your responsibility to ensure that the agents that you supervise are successful.
The Supervisor Role
As a supervisor, your account might be set up to enable you to perform different tasks to manage and support your team, assist with interactions, manage in-progress interactions and queues. Supervisor tasks include the following:
Monitor, Coach, and Barge-in
Workspace enables you to monitor, coach, and/or barge-in to voice and/or chat interactions that are being handled by the agents that you supervise.
Overview
You can monitor their performance on voice calls and chat interactions, coach them on voice calls and chat interactions as part of their training or to help with a difficult-to-handle contact, or join (barge-in to) a voice call or chat interaction to help the contact directly.
You select which agent or agents to monitor by using the Team Communicator.
Conseil
- You can monitor only one agent at a time on the voice channel.
- You can monitor several agents simultaneously on the chat channel.
- If an agent that you want to monitor is logged in to both the voice and chat channels, you can monitor that agent on both channels.
When the agent whom you are monitoring accepts an interaction, an interaction notification is displayed on your desktop. If you accept the interaction, an interaction window is displayed on your desktop, and you are connected to the voice call or chat interaction.
If you are monitoring the agent, neither the agent nor the contact can hear you or are aware of your presence unless the agent's account is configured to notify the agent when he or she is being monitored (an icon is displayed in the Voice interaction window), or he or she might be configured to be monitored without his or her knowledge.
If you are coaching an agent during a voice call, the agent can hear you, but the contact cannot. If you are coaching an agent during a chat interaction, the agent can see your chat messages, but the contact cannot.
You can choose to join (barge-in to) a call or chat interaction.
Workspace enables you to switch from certain team supervision modes to others.
Agent State
The My Agents dashboard lets you view and manage the state of the agents that you supervise. You can log out agents or change their status to Ready or Not Ready.
Overview
A common thing for agents to do is to forget to logoff of media channels at the end of the day or when they are on an extended not ready state, for example for meetings or lunch. If your agent accounts are set to auto answer calls, this behavior can result in interactions being accepted by an agent's unattended workstation. You can monitor the states of all the agents that you supervise and change them to ensure the best customer experience. You can log agents off globally from all logged on channels.
Agents might also forget to change their state to Ready or to Not Ready. The My Agents view lets you view and change agent state for each channel.
Email QA Review
Workspace enables you to review outbound email interactions created by agents that you supervise, lead, or review, for Quality Assurance (QA) purposes. If you are a reviewer, outbound email interactions are directed to you before being sent to a customer. As a reviewer, your account might be set up to direct outbound email interactions to you, or you might have to retrieve outbound email interactions from a workbin.
Workbin and Queue Management
You can open, mark done, delete, and move in-progress interactions that are stored in the workbins of your team members and in interaction queues that you manage.
How do I monitor my agents?
When you monitor a selected agent who is in the group of agents that you supervise, an interaction preview window tells you that the selected agent is handling a voice or chat interaction. You can monitor the next interaction of an agent. Your account might also be set up to let you monitor the current voice interaction of an agent.
You can start monitoring an agent in your group by using the Team Communicator to find the agent. In the Action Menu, select Monitor Agent ( ).
).
You can end monitoring an agent by using the Team Communicator and selecting Stop Monitoring in the Action Menu ( ).
).
You can stop monitoring the current interaction by clicking End Monitoring ( ) in the Call Actions toolbar in the interaction window.
[+] Monitoring a voice interaction
Monitoring a Voice Interaction
Monitoring an agent who is handling an interaction means that you can listen to a voice interaction between an agent and a contact without the agent or contact being aware that you are listening. Agents can be configured to be notified when they are being monitored. You can monitor the current or next interaction of an agent.
Conseil
You can monitor only one voice agent at a time.
- Use the Team Communicator in the Main Window to find an agent (see the Main Window Team Communicator figure) in the agent group to which you have been assigned as a Supervisor.
- Open the Action Menu for the agent whom you want to monitor and select Monitor Agent (see the Internal Target Action Menu figure).
Or, to monitor the next interaction if your account is set up to let you monitor the current or next interaction, open the Action Menu for the agent whom you want to monitor and select Monitor, then select Agent. To monitor the current interaction (if your account is set up for this feature), open the Action Menu for the agent whom you want to monitor and select Monitor, then select Current Voice Interactions (see the Internal Target Action Menu figure).
A system message is displayed that informs you that monitoring of interactions on your configured channels has started for the selected agent.
In the Team Communicator, the Action Menu for the agent whom you are monitoring changes to the Stop Monitoring button.
- When the monitored agent accepts a voice interaction, a notification is displayed on your desktop. Click Accept to begin monitoring the interaction. The Voice Interaction Monitoring window is displayed on your desktop and you are connected to the call. Neither the contact nor the agent can hear you, but you can hear both parties.
If you do not click Accept, the notification will be dismissed automatically.
If the agent is already handling an interaction when you start monitoring, you will have to wait for the next interaction to start monitoring.
If the account of the monitored agent is configured so that the agent is notified when he or she is being monitored, an eye icon is displayed next to the party-interaction icon in the Voice Interaction window on the agent's desktop.
The same icon is displayed in the Voice Interaction Monitoring window on your desktop next to the party Action menu.
- During a monitoring session, you can perform the following actions from the Voice Interaction Monitoring window:
- End Monitoring—Click End Monitoring (
 ) in the Supervisor controls of the Call Actions toolbar to end the monitoring session.
- Barge-in—Click Barge-in (
 ) in the Supervisor controls of the Call Actions toolbar to join the monitored call. Both parties will be able to hear you. You can switch back to monitoring by clicking End the Call (
 ) in the Call Actions toolbar.
If you stopped monitoring, you are disconnected from the call. The monitoring-indicator icon is removed from the Voice Interaction window of the agent.
If the agent ends the call while you are still monitoring the agent, your monitoring session ends automatically.
- Click Done to close the Voice Interaction Monitoring window and mark the interaction as Done.
- To stop monitoring the agent, use the Team Communicator to find the agent whom you are monitoring.
- Open the Action Menu for the agent, and select Stop Monitoring (see the Internal Target Action Menu figure).
A system message is displayed that informs you that monitoring of interactions on your configured channels has ended for the selected agent.
[+] Monitoring a chat interaction
Monitoring a Chat Interaction
Monitoring an agent who is handling an interaction means that you can read a chat interaction between an agent and a contact without the agent or contact being aware that you are reading the interaction. Agent accounts can be configured to notify agents when they are being monitored. You can monitor the next interaction of an agent.
- Use the Team Communicator in the Main Window to find an agent (see the Main Window Team Communicator figure) in the agent group to which you have been assigned as a Supervisor.
- To monitor the next interaction, open the Action Menu for the agent whom you want to monitor and select Monitor Next Interactions (see the Internal Target Action Menu figure).
A system message is displayed that informs you that monitoring of interactions on your configured channels has started for the selected agent.
In the Team Communicator, the Action Menu for the agent whom you are monitoring changes to the Stop Monitoring button.
- When the monitored agent accepts a chat interaction, a notification is displayed on your desktop. Click Accept to begin monitoring the interaction. The Chat Interaction Monitoring window is displayed on your desktop and you are connected to the chat session. You can read the chat transcript, but you cannot send any text to the contact or the agent.
If you do not click Accept, the notification will be dismissed automatically.
If the agent is already handling an interaction when you start monitoring, you will have to wait for the next interaction to start monitoring.
The same icon is displayed in the Chat Interaction Monitoring window on your desktop next to the party Action menu.
- During a monitoring session, you can perform the following actions from the Chat Interaction Monitoring window:
- End Monitoring—Click End Monitoring () in the Supervisor controls of the Call Actions toolbar to end the monitoring session.
- Barge-in—Click Barge-in () in the Supervisor controls of the Call Actions toolbar to join the monitored chat session. Both parties will be able to see your messages. You can switch back to monitoring by clicking End Chat (
 ) in the Call Actions toolbar.
- Coach via voice—Select Coach via Voice from the agent party Action menu. An voice session is added to the Chat Interaction window. You can coach the agent whom you are monitoring by speaking directly to the agent.
- Coach via chat—Select Coach via Chat from the agent party Action menu. A chat session is added to the Chat Interaction window. You can coach the agent whom you are monitoring by sending chat messages to the agent.
If you stopped monitoring, you are disconnected from the chat session. The monitoring indicator icon is removed from the Chat Interaction window of the agent.
If the agent ends the chat session while you are still monitoring the agent, your monitoring session ends automatically.
- Click Done to close the Chat Interaction Monitoring window and mark the interaction as Done.
- To stop monitoring the agent, use the Team Communicator to find the agent whom you are monitoring.
- Open the Action Menu for the agent and select Stop Monitoring (see the Internal Target Action Menu figure).
A system message is displayed that informs you that monitoring of interactions on your configured channels has ended for the selected agent.
How do I coach my agents?
When you coach a selected agent who is in the group that you supervise, an interaction preview window tells you that the selected agent is handling a voice or chat interaction.
You can start coaching an agent in your group by using the Team Communicator to find the agent. In the Action Menu, select Coach Agent ( ). Your account might also be set up to let you coach the current voice interaction of an agent.
You can end coaching an agent by using the Team Communicator and selecting Stop Coaching from the Action Menu ( ).
).
You can end coaching the current interaction by selecting End Monitoring ( ) in the Call Actions toolbar in the interaction window.
[+] Coaching a voice interaction
Coaching a Voice Interaction
Coaching an agent who is handling an interaction means that you can listen to a voice interaction between an agent and a contact and speak to that agent without the contact being aware that you are listening and speaking to the agent. You can coach the current or next interaction of an agent.
- Use the Team Communicator in the Main Window to find an agent (see the Main Window Team Communicator figure) in the agent group to which you have been assigned as a Supervisor.
- Open the Action Menu for the agent whom you want to coach and select Coach Agent (see the Internal Target Action Menu figure). If there is a currently active interaction, it is displayed in the Coach menu.
Or, to coach the next interaction if your account is set up to let you coach the current or next interaction, open the Action Menu for the agent whom you want to coach and select Coach, then select Agent. To coach the current interaction (if your account is set up for this feature), open the Action Menu for the agent whom you want to coach and select Coach, then select Current Voice Interactions.
A system message is displayed that informs you that coaching of interactions on your configured channels has started for the selected agent.
In the Team Communicator, the Action Menu for the agent whom you are coaching changes to the Stop Coaching button.
- When the coached agent accepts a voice interaction, a notification is displayed on your desktop. Click Accept to begin coaching the interaction. The Voice Interaction Monitoring window is displayed on your desktop and you are connected to the call. You can hear the agent and the agent can hear you, but the contact can hear only the agent.
If you do not click Accept, the notification will be dismissed automatically, and you will not be able to coach the interaction unless you stop coaching and start coaching the same agent.
If the agent is already handling an interaction when you start coaching, a notification is displayed immediately. If you click Accept, you will begin coaching the call that is already in progress.
The eye icon is displayed in the Voice Interaction Coaching window on your desktop next to the party Action menu.
- During a coaching session, you can perform the following actions from the Voice Interaction Coaching window:
- End Monitoring—Click End Monitoring () in the Supervisor controls of the Call Actions toolbar to end the coaching session.
If you stopped coaching, you are disconnected from the call.
If the agent ends the call while you are still coaching the agent, your coaching session ends automatically.
- Click Done to close the Voice Interaction Coaching window and mark the interaction as Done.
- To stop coaching the agent, use the Team Communicator to find the agent whom you are coaching.
- Open the Action Menu for the agent and select Stop Coaching (see the Internal Target Action Menu figure).
A system message is displayed that informs you that coaching of interactions on your configured channels has ended for the selected agent.
[+] Coaching a chat interaction
Coaching a Chat Interaction
Coaching an agent who is handling an interaction means that you can read the transcript of the interaction between an agent and a contact and send chat messages to the agent without the contact being aware that you are reading the transcript and communicating with the agent. You can coach the next interaction of an agent.
- Use the Team Communicator in the Main Window to find an agent (see the Main Window Team Communicator figure) in the agent group to which you have been assigned as a Supervisor.
- Open the Action Menu for the agent whom you want to coach and select Coach next interactions (see the Internal Target Action Menu figure).
A system message is displayed that informs you that coaching of interactions on your configured channels has started for the selected agent.
In the Team Communicator, the Action Menu for the agent whom you are coaching changes to the Stop Coaching button.
- When the coached agent accepts a chat interaction, a notification is displayed on your desktop. Click Accept to begin coaching the interaction. The Chat Interaction Monitoring window is displayed on your desktop and you are connected to the chat session. You can read the chat transcript and send private chat messages to the agent without the contact seeing your messages.
If you do not click Accept, the notification will be dismissed automatically, and you will not be able to coach the interaction unless you stop coaching and start coaching the same agent.
If the agent is already handling an interaction when you start coaching, a notification is displayed immediately. If you click Accept, you will begin coaching the chat session that is already in progress.
The eye icon is displayed in the Chat Interaction Coaching window on your desktop next to the party Action menu.
- During a coaching session, you can perform the following actions from the Chat Interaction Coaching window:
- End Monitoring—Click End Monitoring () in the Supervisor controls of the Call Actions toolbar to end the coaching session.
- Barge-in—Click Barge-in () in the Supervisor controls of the Call Actions toolbar to join the monitored chat session. Both parties will be able to see your messages. Your coaching session ends when you barge-in to the chat.
Click Done to close the coaching session in the window and mark the coaching interaction as Done. You can switch to monitoring the chat session (see Monitoring a Chat Interaction in the Monitor tab) by clicking End Chat () in the Call Actions toolbar.
- Coach via voice—Select Coach via Voice from the agent party Action menu. An voice session is added to the Chat Interaction window. You can coach the agent whom you are monitoring by speaking directly to the agent.
If you stopped coaching, you are disconnected from the chat session.
If the agent ends the chat session while you are still coaching the agent, your coaching session ends automatically.
- Click Done to close the Chat Interaction Coaching window and mark the interaction as Done.
- To end coaching the agent, use the Team Communicator to find the agent whom you are coaching.
- Open the Action Menu for the agent and select Stop Coaching (see the Internal Target Action Menu figure).
A system message is displayed that informs you that coaching of interactions on your configured channels has ended for the selected agent.
How do I Barge-in on my agent's call?
When you barge-in (join) to an active interaction, you must already be monitoring the interaction.
To barge-in to an active interaction that you are monitoring, click Barge-in ( ) in the Supervision toolbar. Barge-in is a simple button if you are supervising a single channel interaction (voice or chat).
How do I switch my Agent Monitoring Mode?
Workspace enables you to switch from certain supervision modes to others. During the monitoring, coaching, or barge-in of an interaction, you can switch from one supervision mode to another. The following transitions are supported:
- Monitoring to barge-in—Click Barge-in (
 ) in the Supervision bar.
- Coaching to barge-in (chat only)—Click Barge-in ( in the Supervision bar.
- Coaching to monitoring (chat only)—Click End Chat ().
- Barge-in to monitoring—Click End Call () or End Chat () in the Interaction toolbar to return to monitoring.
- Use End Monitoring () in the Interaction toolbar to end monitoring.
How do I manage the State of my agents?
The My Agents view lets you view and control the ready state and logged in state of all of the agents that you manage.
Open My Agents from the Supporting Views menu.
This view has two parts, the filters and the table of agents. Use the filters to find agents by Group, Channel, Status, and first and/or last name.
In the table of agents, click a status to change it, for example from Ready to Not Ready. To set an agent to Ready or Not Ready on more than one channel, you must manage each channel separately.
To log an agent out of all channels, select Log Out from the Global Status column.
If an agent is Ready on one or more channels, but in a different state on one or more other channels, their global status displays as Conditionally Ready.
How do I review an outbound email?
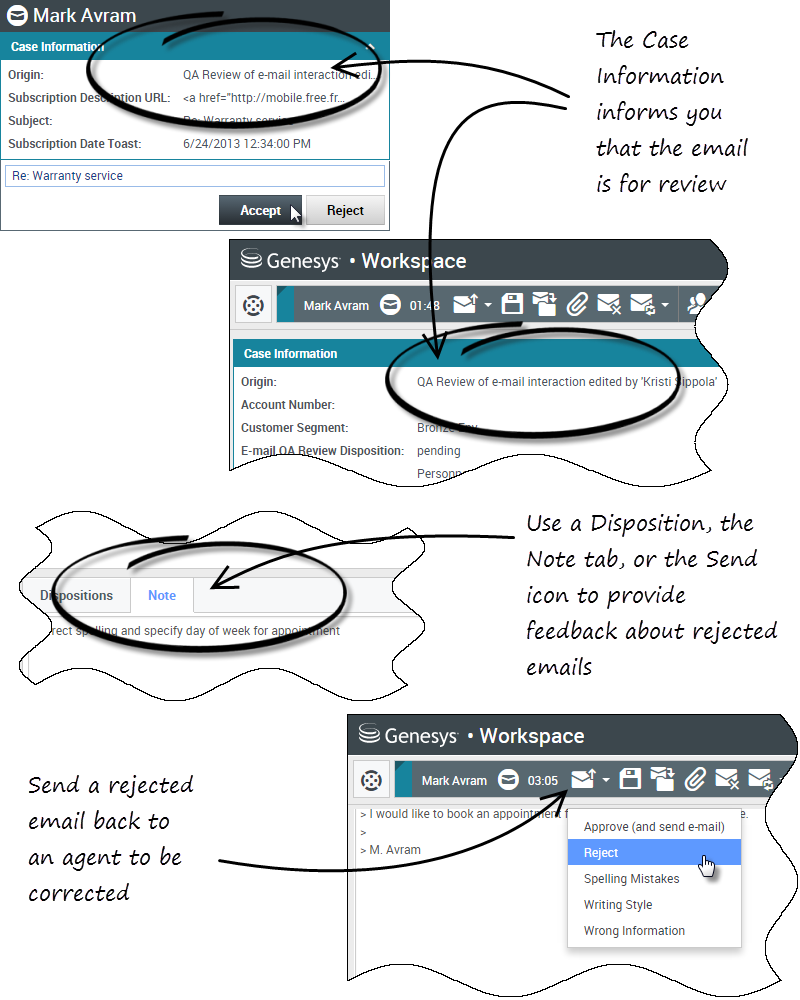
Outbound emails are directed to reviewers before they are sent to a contact. In this example, there is problem with the email and it must be returned to the agent to be fixed.
- When an email interaction for review is directed to you, an interaction preview window opens. The Case Information indicate that the email is for QA review. In this example, the "Origin" field contains the text: "QA Review of email interaction...". Click Accept to display the interaction. The email interaction is displayed on your desktop.
- The Case Information view might be set up to provide you with information about who wrote the email.
- The Email Review icon (
 ) is displayed next to the name of the contact to whom the email interaction will be sent once it is approved.
- Review the content that the agent wrote in the email composition area. You can choose to fix any issues yourself, or send it back to the original agent to fix. Depending on the policy at your company, you might provide feedback by directly editing the content of the email interaction, or you might add notes for the agent, or you might discuss the content with the agent verbally. Other actions available to you include:
- Save changes that you made to the email interaction
- Move the email to a workbin to save the email in your draft email workbin to process later
- Attach a file to the email
- Delete the email
- Start a consultation
- Email interactions that are sent to you for review have a drop-down menu on the Send button. The contents of this menu are set up by your administrator and so might be different than in this example. Click to open the menu. Since a problem was found this email is being returned to the agent to fix. In this example, the administrator has set up different Reject Reasons which will be included in the Case Information when the interaction is returned to the agent. Clicke of the "Reject" options to send the email back to the original agent.
- Now you're ready to approve the email.
How do I approve a fixed outbound email?
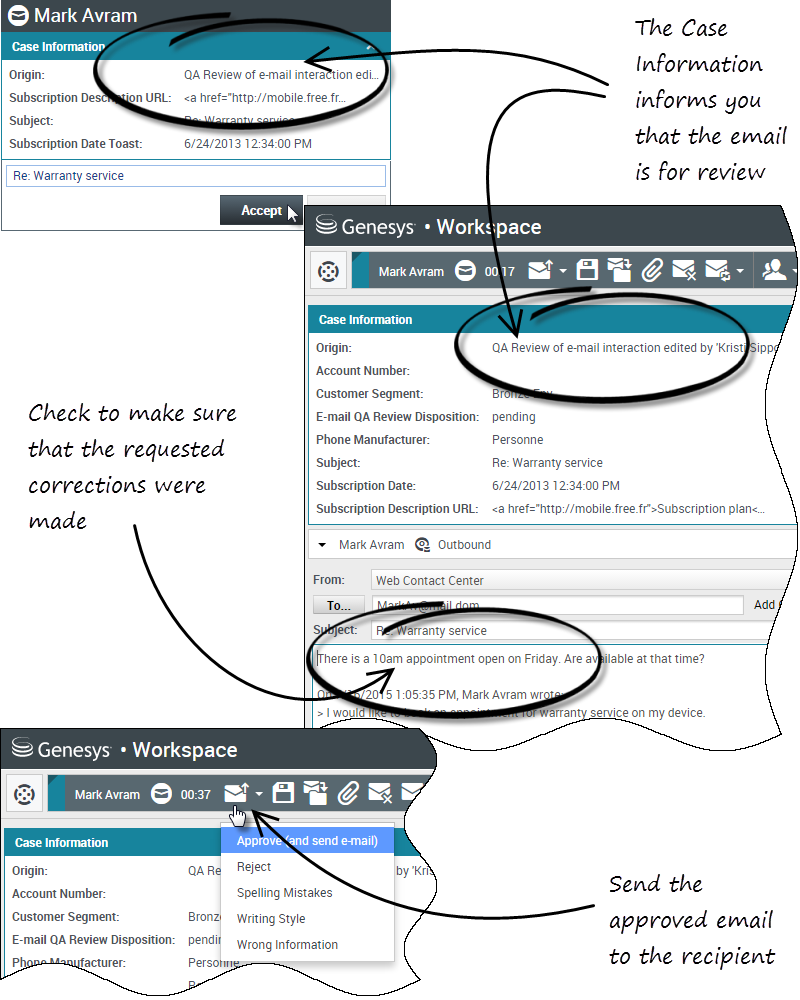
If you are a reviewer, outbound emails are directed to you before they are sent to a contact. In this example, the agent has fixed an earlier identified problem, and the email is directed to you to review.
- When an email interaction for review is directed to you, an interaction preview is displayed on your desktop. The Case Information will indicate that the email is for QA review. In this example, the "Origin" field contains the text: "QA Review of email interaction...". Click Accept to display the interaction. The email interaction is displayed on your desktop.
- The Case Information view might be set up to provide you with information about who wrote the email.
- The Email Review icon () is displayed next to the name of the contact to whom the email interaction will be sent once it is approved.
- Review the content that the agent wrote in the email composition area. You can choose to fix any issues yourself, or send it back to the original agent to fix.
- Assuming that the email is now okay to send to the contact, click the Send icon to open the menu. Since the email is now ready to send to the contact, select the option that represents Accept. In this example, the administrator has added the Approve (and send email) option to the menu.
How do I use the My Team Workbins?
You can perform the following functions on selected interactions in workbins by using the
Workbin Actions buttons (the available actions depend on the type of interaction that you have selected):
- Open

- Mark Done

- Delete
 — if you have the correct permissions
- Move to Queue
 — if you have the correct permissions
- Move to Workbin
 — if you have the correct permissions
- Edit Case Information
 — opens the Edit Case Information window to enable you to edit the content of the Case Data tab for the selected interaction(s).
You can also control-click and/or shift-click items in a workbin to select more than one item. With multiple items selected you can move them to a queue, move them to another workbin, mark them as Done, or update the case information for all of them in the Case Data tab.
[+] Accessing and Using My Team Workbins
Choose My Team Workbins from the Supporting Views menu.
The My Team Workbins view contains an expandable list of all of the agents that you supervise who have workbins. If you click the agent name or the arrow next to the name of one of your agents the view expands to show you the workbins for that agent and the number of interactions stored in each.
To view and manage the interactions that are stored in the agent's workbin, click the name of the workbin. The list of interactions stored in the workbin is displayed for you in the panel to the right of the workbin list.
When you select an interaction in a workbin or an Interaction Queue, the contents, notes, and case data are displayed in tabs at the bottom of the Workbin view. Controls are displayed at the top of the Workbin view that let you perform actions on the interaction that you selected.
The following actions might be available to you, depending on how your system is set up by your administrator or what interaction type you have selected:
- Open
- Mark Done
- Delete
- Move to Queue
- Move to Workbin
- Edit Case Information Opens the Edit Case Information window to enable you to edit the content of the Case Data tab for the selected interaction(s).
You can Ctrl-click and/or Shift-click items in a workbins to select more than one item. With multiple items selected you can move them to a Queue, move them to another Workbin, mark them as Done, or update the Case Information for all of them in the Case Data tab.
How do I manage My Interaction Queues?
How do I edit Case Information for interactions in Workbins and Queues?
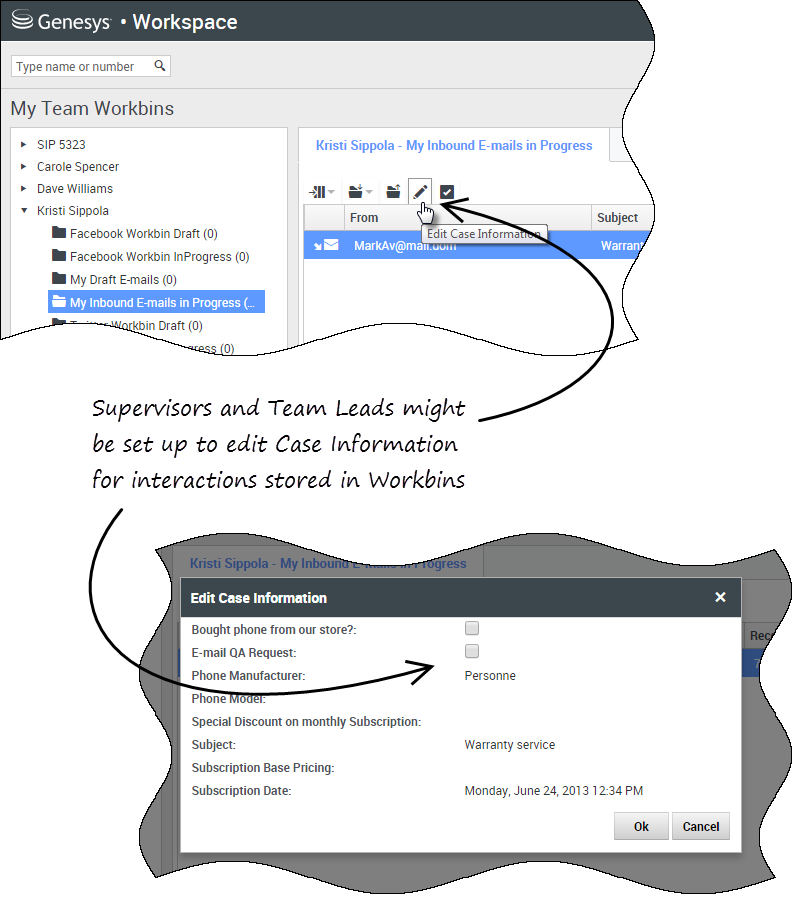
Supervisors and Team Leads might be set up to edit Case Information for interactions that are stored in a Workbin or Queue. Select an interaction to enable the Edit Case Information icon. Click the icon to open the Edit Case Information dialog box. The editing features of this dialog box work the same as the editing features of the Case Information area of an interaction window.
You can edit case information for multiple interactions by selecting two or more interactions. The following rules apply to editing the case information of multiple interactions:
- The Edit Case Information dialog box displays a mix of all of the case information fields that are available in all of the selected interactions.
- Only the common editable fields, check boxes, and menus of the selected interactions are displayed with the edit icon.
- If an editable item has the same value for all of the selected interactions, that value is displayed in the editable field.
- If an editable item has different values for one or more of the selected interactions, the field is displayed as blank.


